Last Updated on May 18, 2026 by Kravelv Spiegel
Mounting a TV on the wall requires five things done in order: find your VESA pattern, choose the right mount type, locate wall studs, set the correct height (42 inches from floor to screen center for standard seated viewing), and secure the mount into studs with hardware rated for at least double your TV’s weight. The full process takes 60 to 90 minutes for most installations. Never mount into drywall alone without studs for any TV over 50 pounds. Running power cords through walls requires in-wall rated cable and proper wall plates to comply with electrical code. This guide covers every step with verified measurements and safety requirements.
What You Need Before You Start
Gathering every tool and piece of information before drilling saves trips to the hardware store and prevents the most common mounting errors. The tools you need are: a stud finder, power drill with Phillips head and masonry bits, a level (48-inch or longer), painter’s tape, measuring tape, pencil, and a second person for TVs larger than 55 inches. The information you need before touching the wall is your TV’s VESA pattern, your TV’s weight, and the type of wall you are mounting into.
The wall type determines your hardware strategy. Most homes use wood-stud framing behind drywall, which is the straightforward case this guide covers. Plaster walls, concrete, brick, and metal stud framing each require different anchors and bits. If you are unsure of your wall construction, knock lightly across the surface and listen for the hollow-to-solid transition that indicates a wood stud, or use a stud finder rated for your wall type.
Never run a standard power cord through a wall. This is an electrical code violation in most jurisdictions and creates a fire hazard. For in-wall cable management, use cables rated CL2 or CL3 for in-wall use and install recessed outlet boxes behind the TV for the power connection. If you are not comfortable with electrical work, have an electrician install the recessed outlet before the TV goes up.
Step 1: Find Your TV’s VESA Pattern
The VESA pattern is the standardized measurement between your TV’s mounting holes, expressed in millimeters as width by height. Every mount is designed to match specific VESA dimensions, and a mismatch means the mount cannot attach to the TV regardless of weight rating. The most common patterns you will encounter are 100x100mm for small TVs under 32 inches, 200x200mm for 32 to 43-inch TVs, 400x400mm for 49 to 65-inch TVs, and 600x400mm or 800x400mm for 75 inches and above.
To find your pattern, check your TV’s manual or search the model number plus the term VESA pattern online. The manufacturer’s website or a spec aggregator will have it. If you prefer to measure directly, flip the TV face down on a soft surface and locate the four threaded holes on the back. Measure the horizontal distance between the centers of the left and right holes, then the vertical distance between the centers of the top and bottom holes. Measure in millimeters for accuracy. That horizontal by vertical measurement is your VESA pattern.
The mount you purchase must list your exact VESA pattern as a supported size. Do not purchase a mount that lists your pattern as its maximum unless you confirm it securely fits that size. Choose a mount with a weight rating of at least double your TV’s listed weight. A 55-inch TV weighing 38 pounds should be on a mount rated for 80 pounds or more.
Step 2: Choose the Right Mount Type
Three mount types cover the vast majority of residential TV installations. A fixed mount keeps the TV flat against the wall with no adjustment after installation. It produces the cleanest, most minimal look and is the most structurally secure, but offers no tilt or swivel adjustment. Fixed mounts are the right choice for TVs positioned directly at eye level with no need to redirect viewing angles.
A tilt mount allows the TV to angle downward from 5 to 15 degrees, which is useful for TVs mounted above the standard 42-inch center height, such as above a fireplace or in a bedroom where the TV sits above a dresser. Tilt mounts maintain most of the fixed mount’s low profile while adding the ability to reduce glare and optimize the viewing angle for an elevated position. A full-motion or articulating mount extends away from the wall on an adjustable arm, allowing the TV to swivel left and right and tilt in multiple directions.
Full-motion mounts are the most flexible but add the most depth to the installation. When fully extended, a full-motion arm can project 15 to 28 inches from the wall, which affects room layout planning. They also put more leverage stress on the wall anchor points and require more robust mounting hardware than fixed or tilt mounts at the same TV weight. For corner installations or rooms where multiple seating positions require different viewing angles, a full-motion mount is worth the additional complexity.
Step 3: Find the Wall Studs
Studs are the vertical wood framing members behind your drywall, typically spaced 16 inches apart from center to center, though 24-inch spacing is common in older construction. All TV mounts except the lightest installations must be anchored into studs rather than drywall alone. Drywall anchors can hold lighter TVs under 50 pounds when used correctly, but mounting into studs provides superior safety for any TV and is the universally recommended approach.
Use a stud finder at the height where your mount’s top mounting hole will sit. Slide the finder slowly across the wall and mark both edges of each stud you locate, then mark the center between those two edge marks. Most stud finders mark the edge of the stud rather than the center. Stud edges are typically 1.5 inches wide, so the center sits 0.75 inches from the marked edge. Verify the stud location by drilling a small pilot hole at the center mark before committing to the full installation.
Most TV mounts attach to two studs. If your mount’s hole spacing does not line up with two studs at your desired height, you have three options: adjust the TV’s horizontal position so the mount holes align with studs, use a mounting system that spans three studs, or for very large TVs, install a 3/4-inch plywood backer board across three or more studs before attaching the mount. The backer board approach is standard practice for 85-inch and larger TVs where the mount hole spacing may not match any two-stud combination.
Step 4: Set the Correct Mounting Height
The most common TV mounting mistake is mounting too high. According to research from the Society of Motion Picture and Television Engineers, optimal viewing comfort occurs when the center of the screen is at or slightly below your seated eye level. For standard couches at standard floor-to-seat height, the screen center should sit approximately 42 inches from the floor. Most people mount TVs at 60 to 70 inches center height, which causes neck strain during extended viewing sessions.
To find your correct height, sit in your primary viewing seat and have someone measure from the floor to your eye level while seated. That measurement is your target screen center height. For most average-height adults on standard sofas, this falls between 40 and 44 inches. Bedrooms with TVs viewed from a lying-down position require a higher mounting point of approximately 54 to 60 inches from the floor to screen center, as the viewing angle shifts when reclined.
Mark your target height on the wall with a pencil. Measure up from the floor at three points across the intended mounting width and use a level to draw a horizontal reference line through those marks. This reference line keeps the mount level independent of the floor, which may not be perfectly level itself. Use painter’s tape to outline the TV’s dimensions on the wall and stand at your viewing position to confirm the placement looks and feels correct before drilling.
Step 5: Attach the Mount to the Wall
Hold the wall plate of the mount against the wall, centered on your stud marks and aligned with your height reference line. Use a level to confirm the mount is perfectly horizontal. Mark the mount’s bolt holes on the wall with a pencil through the mounting holes, then set the mount aside. Drill pilot holes at each marked point using a drill bit slightly smaller than your lag bolt diameter. For wood studs, lag bolts of 5/16-inch diameter and 2.5 to 3 inches long provide solid holding strength for most residential TV installations.
Drive the lag bolts through the mount’s wall plate and into the pilot holes until the plate sits flush and firm against the wall with no movement. Do not overtighten to the point of stripping the wood. Use a level on the mounted wall plate to confirm it is still horizontal after bolting. Any deviation from level at this stage will result in a tilted TV that cannot be corrected without re-drilling. For full-motion mounts, attach all arms and extension brackets to the wall plate before hanging the TV.
Step 6: Attach the Bracket to the TV
Lay the TV face down on a clean, padded surface. Most mount packages include multiple sets of screws to accommodate different VESA thread specifications. Check the TV manual to confirm the correct thread size and bolt length for your model. Using the wrong bolt length is a common error: bolts too long can damage internal components by penetrating too far into the TV’s back panel.
Attach the TV-side brackets (rails or plate, depending on mount type) to the TV’s mounting holes using the correct bolts and washers. Hand-tighten first, then snug all bolts with a screwdriver without over-torquing. Confirm all four mounting points are secure before lifting the TV.
Step 7: Hang the TV and Connect Cables
With one or preferably two people, lift the TV and engage the TV-side brackets with the wall plate. Most mounts use a hook-and-rail or click-lock engagement that snaps or slides into place. Once the TV is seated on the mount, locate and tighten the safety screw or pin that prevents the TV from disengaging from the mount. This safety fastener is included with every mount and must be installed. Do not skip this step regardless of how secure the TV feels without it.
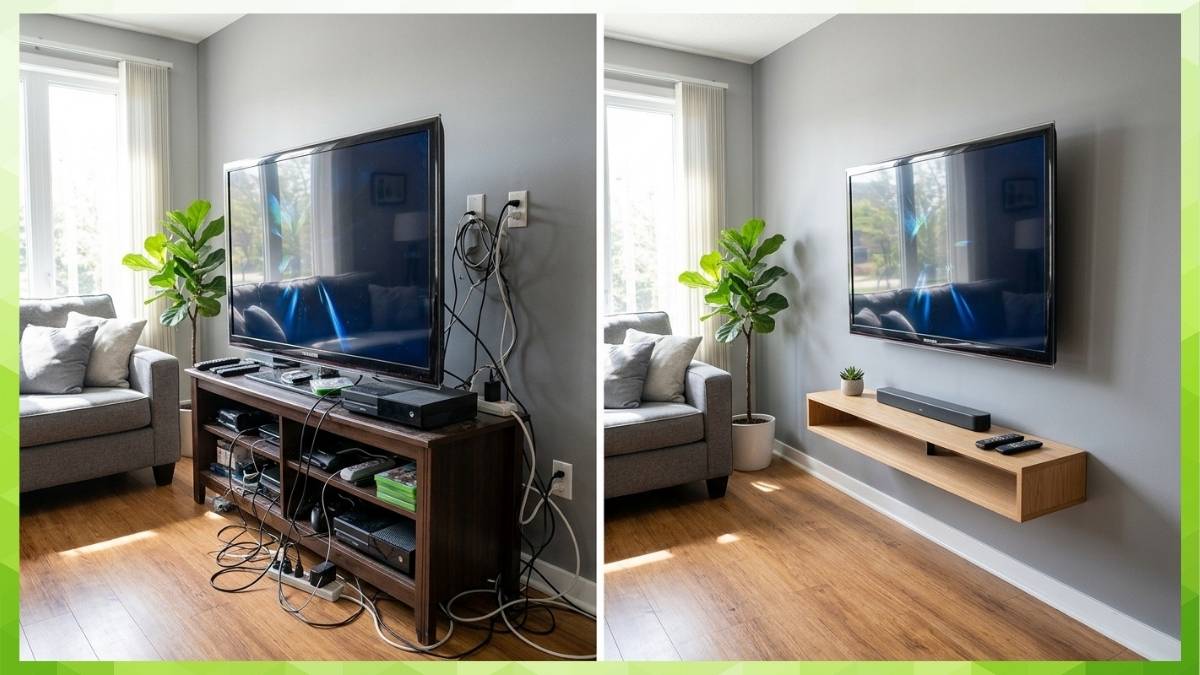
Connect all cables before pushing the TV flat against the wall. HDMI, optical audio, ethernet, and antenna cables are far easier to access from the side and bottom of the TV before it is mounted close to the wall. For full-motion mounts, run cables with enough slack to accommodate full swivel extension. Route cables down the wall using adhesive cable raceways, in-wall conduit, or a cable cover that matches the wall color. Plug into the wall outlet and power on the TV to confirm all connections function correctly before finishing cable management.
Mount Type Reference Guide
| Mount Type | Wall Clearance | Tilt | Swivel | Best For |
|---|---|---|---|---|
| Fixed | 1 to 2 inches | No | No | Eye-level installation, minimal look |
| Tilt | 2 to 4 inches | 5 to 15 degrees down | No | Above-eye-level positions, glare reduction |
| Full-motion | 3 to 28 inches extended | Yes | Yes | Corner mounting, multiple seating positions |
Common Mistakes and How to Avoid Them
Mounting too high is the most frequent error and the one most people regret. If the 42-inch center-height guideline produces a number that feels too low, test it with painter’s tape before drilling. Most people find it feels lower than expected but looks and feels better during actual viewing sessions.
Using drywall anchors alone for a heavy TV is the most dangerous error. Drywall anchors rated for your TV’s static weight can fail under the dynamic load of the TV being adjusted or bumped. Always anchor into studs for TVs over 50 pounds. Running a standard household extension cord through the wall is an electrical code violation and a fire hazard. Use in-wall rated CL2 or CL3 cable for any wiring that passes through a wall cavity.
Buying a mount without verifying VESA compatibility first is a common and avoidable error. Always confirm the VESA pattern and weight rating before purchasing the mount, not after it arrives. Returning a mount is more inconvenient than taking two minutes to check the specifications.
Frequently Asked Questions
The center of your TV screen should be at your seated eye level, typically 42 inches from the floor for standard couches. Most people mount TVs too high, causing neck strain during extended viewing. Measure your actual seated eye height and use that figure rather than a generic estimate.
For TVs under 50 pounds, heavy-duty toggle anchors rated for the TV’s weight can work when distributed across multiple anchor points. For TVs over 50 pounds, mounting into wall studs is required for safe installation. A mount that pulls from drywall under a heavy TV can cause serious injury and wall damage.
Check your TV’s manual or search the model number plus VESA pattern online. Alternatively, measure the distance between the centers of the mounting holes on the back of the TV in millimeters, horizontal by vertical. That measurement is your VESA pattern.
For most residential installations, 5/16-inch diameter lag bolts at 2.5 to 3 inches in length provide adequate holding strength. The bolt must penetrate at least 1.5 inches into the stud beyond the drywall and mount plate thickness.
Not for the mount installation itself. To hide the power cord inside the wall, use in-wall rated CL2 or CL3 cable and proper wall plates, or have an electrician install a recessed outlet behind the TV. Running a standard power cord through a wall cavity is a code violation and a fire hazard.
Last updated: May 2026 | Sources: Consumer Reports TV Wall Mount Guide, Society of Motion Picture and Television Engineers Viewing Angle Standards, Mount-It VESA Guide, NYC TV Guy VESA Pattern Chart (April 2026), Express Mounting VESA Guide (December 2025), GuideSpot TV Mounting Guide (September 2025).